maridb 10.4.32部署
AI-摘要
切换
Tianli GPT
AI初始化中...
介绍自己
生成本文简介
推荐相关文章
前往主页
前往tianli博客
maridb 10.4.32部署
一 准备工作

1.1 官网下载地址:
wget https://dlm.mariadb.com/3560022/MariaDB/mariadb-10.4.32/bintar-linux-x86_64/mariadb-10.4.32-linux-x86_64.tar.gz

tar xf mariadb-10.4.32-linux-x86_64.tar.gz -C /data/mysql
1.2 依赖安装
yum -y install libaio numactl-libs ncurses
1.3 用户和组
groupadd mysql
useradd -r -g mysql -s /bin/false mysql

mkdir -p /data/mysql/{db_file,log,temp}
chown -R mysql.mysql /data/mysql
chmod -R 775 /data/mysql

cd /usr/local/mysql/
./scripts/mysql_install_db --user=mysql --basedir=/usr/local/mysql --datadir=/data/mysql/db_file
1.4 创建目录和授权
chown -R mysql:mysql /usr/local/mysql1.5 修改启动文件
cp -p /usr/local/mysql/support-files/mysql.server /etc/init.d/mysqld
vim /etc/init.d/mysqld
#主要修改路径变量的值
basedir=/usr/local/mysql
datadir=/data/mysql/db_file
mysqld_pid_file_path=/data/mysql/temp/mysqld.pid
1.6 主备配置文件
cat > /data/mysql/my.cnf << -'EOF'
[client]
port                = 3306
socket              = /tmp/mysql.sock

[mysqld]
port                = 3306
socket              = /tmp/mysql.sock
user            = mysql
basedir         = /usr/local/mysql
datadir         = /data/mysql/db_file
log_bin             = /data/mysql/bin-log
log_bin_index       = /data/mysql/mysql-bin.index
server_id           = 148
binlog_format       = ROW

init_connect='SET collation_connection=utf8mb4_unicode_ci'
init_connect='SET NAMES utf8mb4'
character-set-server=utf8mb4
skip-character-set-client-handshake
skip-name-resolve
slow_query_log_file = /data/mysql/log/slow-query.log
expire_logs_days  = 3
innodb_file_per_table = NO
max_connections = 1500
ft_min_word_len = 1
default-storage-engine = InnoDB
innodb_buffer_pool_size = 8G
innodb_log_file_size = 512M

[mysqld_safe]
open-files-limit = 8192
log-error=/data/mysql/log/mysqld.log
pid-file=/data/mysql/temp/mysqld.pid
EOF

chown -R mysql:mysql /usr/local/mysql
ln -s /data/mysql/my.cnf /etc/
1.7 启动&自启动mariadb
service mysqld start
chkconfig --add mysqld
chkconfig mysqld on
1.8 初始化
/usr/local/mysql/bin/mysql_secure_installation[root@centos8-liyj ~]#cd /usr/local/mysql/support-files/
[root@centos8-liyj /usr/local/mysql/support-files]#mysql_secure_installation
NOTE: RUNNING ALL PARTS OF THIS SCRIPT IS RECOMMENDED FOR ALL MariaDB
SERVERS IN PRODUCTION USE! PLEASE READ EACH STEP CAREFULLY!
In order to log into MariaDB to secure it, we'll need the current
password for the root user. If you've just installed MariaDB, and
haven't set the root password yet, you should just press enter here.
Enter current password for root (enter for none): 当前数据库管理员的密码,无密码直接回
OK, successfully used password, moving on...
Setting the root password or using the unix_socket ensures that nobody
can log into the MariaDB root user without the proper authorisation.
You already have your root account protected, so you can safely answer 'n'.
Switch to unix_socket authentication [Y/n] y 切换到unix_套接字身份验证
Enabled successfully!
Reloading privilege tables..
... Success!
You already have your root account protected, so you can safely answer 'n'.
Change the root password? [Y/n] y 设定数据管理员密码
New password:
Re-enter new password:
Password updated successfully!
Reloading privilege tables..
... Success!
By default, a MariaDB installation has an anonymous user, allowing anyone
to log into MariaDB without having to have a user account created for
them. This is intended only for testing, and to make the installation
go a bit smoother. You should remove them before moving into a
production environment.
Remove anonymous users? [Y/n] y 移除匿名用户登录
... Success!
Normally, root should only be allowed to connect from 'localhost'. This
ensures that someone cannot guess at the root password from the network.
Disallow root login remotely? [Y/n] y 移除管理原远程登录
... Success!
By default, MariaDB comes with a database named 'test' that anyone can
access. This is also intended only for testing, and should be removed
before moving into a production environment.
Remove test database and access to it? [Y/n] y 移除测试库
- Dropping test database...
... Success!
- Removing privileges on test database...
... Success!
Reloading the privilege tables will ensure that all changes made so far
will take effect immediately.
Reload privilege tables now? [Y/n] y 刷新数据库
... Success!
Cleaning up...
All done! If you've completed all of the above steps, your MariaDB
installation should now be secure.
Thanks for using MariaDB!1.9 声明环境变量
cat << EOF > /etc/profile.d/mysql.sh
export PATH=/usr/local/mysql/bin:$PATH
EOF
source /etc/profile
二 主从
2.1 授权
mysql -u root -p

grant all on *.* to root@'192.%' identified by 'zdsoft';

grant replication slave,replication client on *.* TO 'backup'@'%' IDENTIFIED BY '123456';
flush privileges;
2.2从节点配置
vi my.cnf
cat my.conf-slave
[client]
port                = 3306
socket              = /tmp/mysql.sock

[mysqld]
port                = 3306
socket              = /tmp/mysql.sock
user            = mysql
basedir         = /usr/local/mysql
datadir         = /data/mysql/db_file
#log_bin             = /data/mysql/bin-log
#log_bin_index       = /data/mysql/mysql-bin.index
server_id           = 180
#binlog_format       = ROW
relay_log        =/data/mysql/relay-bin

init_connect='SET collation_connection=utf8mb4_unicode_ci'
init_connect='SET NAMES utf8mb4'
character-set-server=utf8mb4
skip-character-set-client-handshake
skip-name-resolve
slow_query_log_file = /data/mysql/log/slow-query.log
expire_logs_days  = 3
innodb_file_per_table = NO
max_connections = 1500
ft_min_word_len = 1
default-storage-engine = InnoDB
innodb_buffer_pool_size = 8G
innodb_log_file_size = 512M

[mysqld_safe]
open-files-limit = 8192
log-error=/data/mysql/log/mysqld.log
pid-file=/data/mysql/temp/mysqld.pid
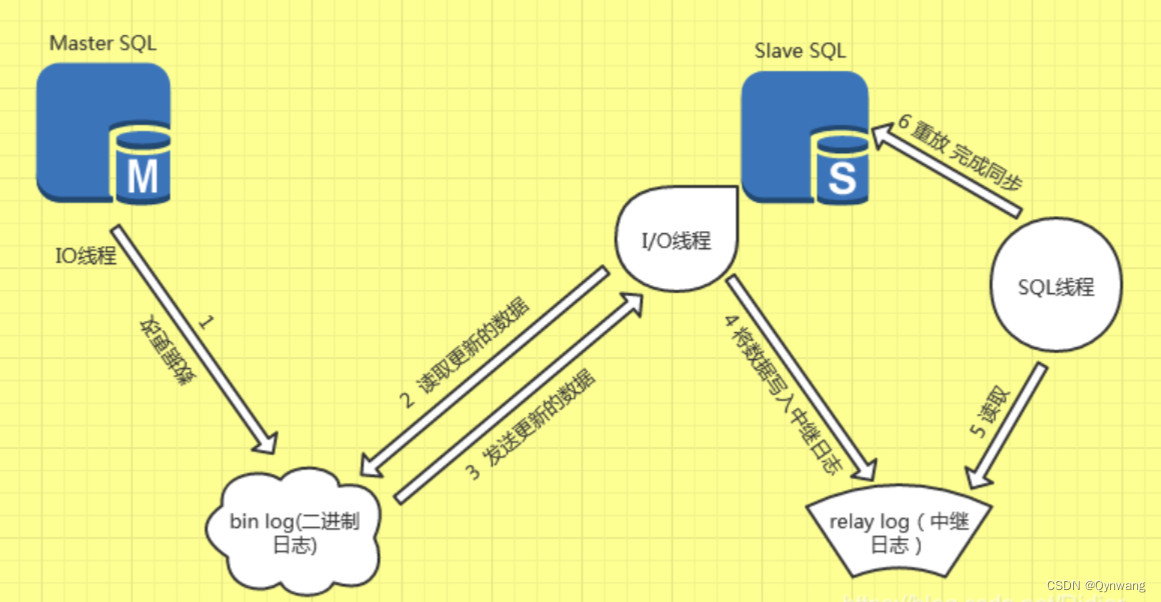
2.3 主节点操作
#记住file和position的部分,从服务器会用到
.MySQL主节点上加锁,阻止所有的写入操作
mariadb> FLUSH TABLES WITH READ LOCK;
1
8.MySQL主节点上,查看bin-log的文件名和位置
mariadb> SHOW MASTER STATUS;
MariaDB [(none)]> show master status;

+-------------------+----------+--------------+------------------+

| File              | Position | Binlog_Do_DB | Binlog_Ignore_DB |

+-------------------+----------+--------------+------------------+

| mysql-bin.000002 |   5327893|              |                  |

+-------------------+----------+--------------+------------------+
2.4 从节点操作
change master to master_host='192.168.1.101',master_user='backup',master_password=123456,master_log_file=mysql-bin.000002',master_log_pos=123;

start slave;
2.5 从节点验证
查看Slave_IO_Running和Slave_SQL_Running是否成功,只有 这两个状态 都是 YES才可以复制
show slave status\G-*2.6 主节点解锁
UNLOCK TABLES;- 感谢你赐予我前进的力量
赞赏者名单
因为你们的支持让我意识到写文章的价值🙏
作者编辑不易,如有转载请注明出处。完整转载来自https://wangairui.com 网站名称:猫扑linux
评论
匿名评论
隐私政策
你无需删除空行,直接评论以获取最佳展示效果


