nightingale夜莺平台多云场景部署教程
AI-摘要
切换
Tianli GPT
AI初始化中...
介绍自己
生成本文简介
推荐相关文章
前往主页
前往tianli博客
nightingale夜莺平台多云场景部署教程
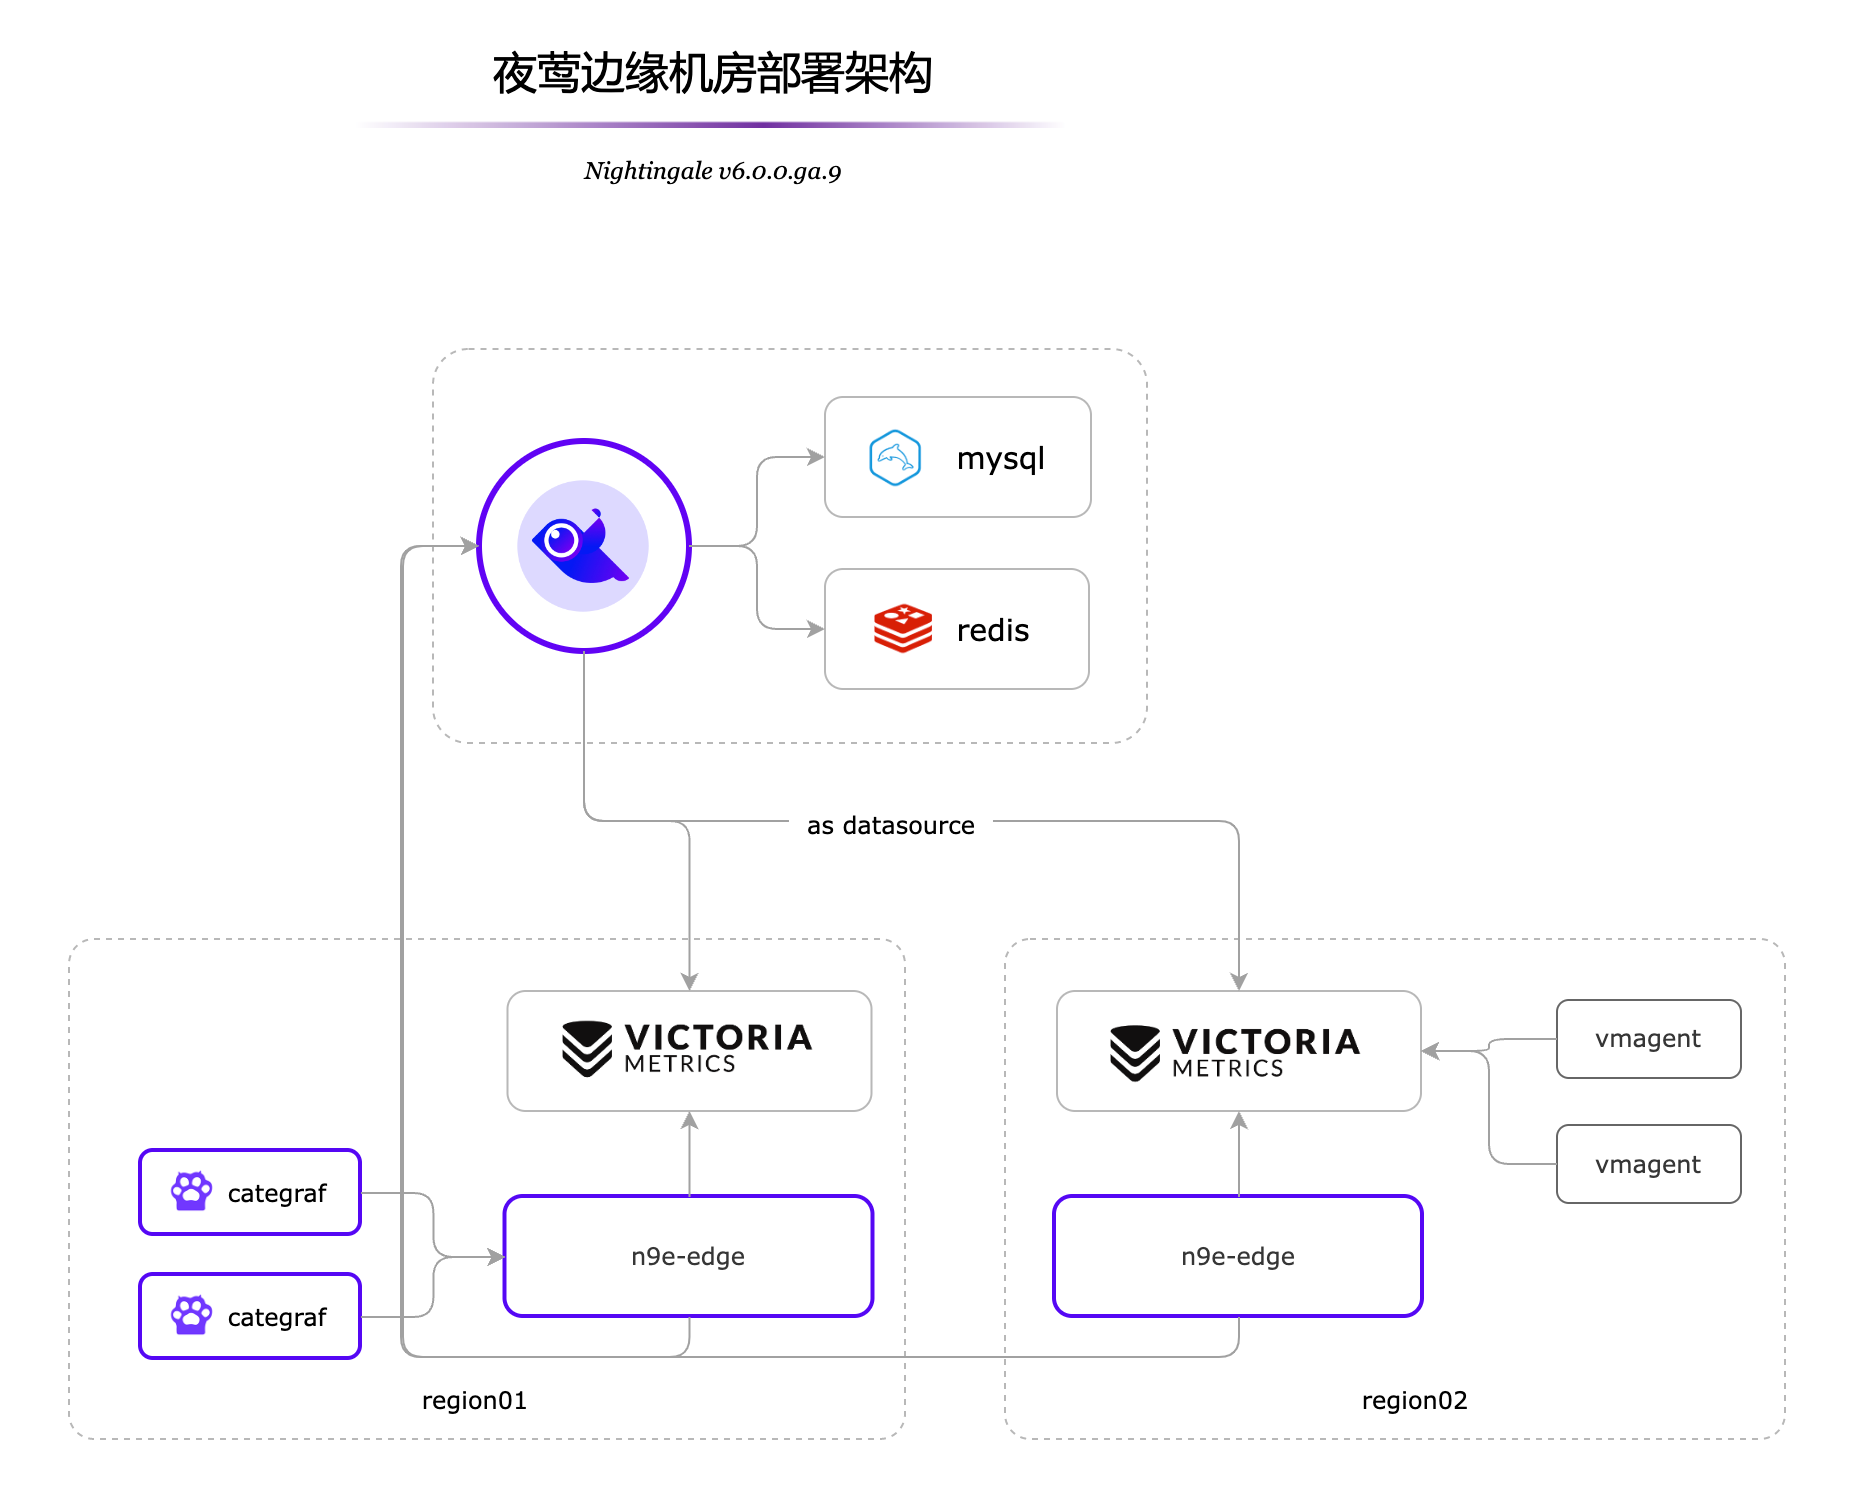
一 拓扑图
 二 部署步骤
安装部署详解 - 快猫星云 (flashcat.cloud)
下载victoriametrics
安装前置依赖
我们更推荐二进制的方式来部署,后文都是以二进制的方式来说明部署方式以及架构。夜莺依赖 mysql 存储用户配置类数据,依赖 redis 存储 jwt token 和机器心跳上报的 metadata,所以,先准备 mysql 和 redis。这俩组件请大家自行安装,这里也提供一个小脚本来安装这两个组件,大家可以参考:
# install mysql
yum -y install mariadb*
systemctl enable mariadb
systemctl restart mariadb
mysql -e "SET PASSWORD FOR 'root'@'localhost' = PASSWORD('1234');"
# install redis
yum install -y redis
systemctl enable redis
systemctl restart redis
安装夜莺
# 创建个 n9e 的目录,后面把 n9e 相关的文件解压到这里
mkdir -p /opt/n9e && cd /opt/n9e

# 下载 n9e 发布包,amd64 是 x84 的包,下载站点也提供 arm64 的包,如果需要其他平台的包则要自行编译了
tarball=n9e-v6.0.1-linux-amd64.tar.gz
urlpath=https://download.flashcat.cloud/${tarball}
wget -q $urlpath || exit 1

# 解压缩发布包
tar zxvf ${tarball}

# 解压缩之后,可以看到 n9e.sql 是建表语句,导入数据库
mysql -uroot -p1234 < n9e.sql

# 启动 n9e,先使用 nohup 简单测试,如果需要 systemd 托管,请自行准备 service 文件
nohup ./n9e &> n9e.log &

# 检查 n9e.log 是否有异常日志,检查端口是否在监听,正常应该监听在 17000
ss -tlnp|grep 17000
##脚本启动和系统加载默认启动2种方式
##脚本方式
cat > /opt/n9e/start_n9e_server_webapi.sh << 'EOF'
#!/bin/bash
nohup /opt/n9e/n9e &> server.log &
EOF
####开机启动
cat <<EOF >/etc/systemd/system/n9e.service
[Unit]
Description="n9e"
After=network.target

[Service]
Type=simple

ExecStart=/opt/n9e/n9e > server.log
WorkingDirectory=/opt/n9e

Restart=on-failure
SuccessExitStatus=0
LimitNOFILE=65536
StandardOutput=syslog
StandardError=syslog
SyslogIdentifier=n9e

[Install]
WantedBy=multi-user.target
EOF
##启动命令
systemctl daemon-reload
systemctl enable n9e.service
systemctl restart n9e.service
systemctl status n9e.service安装Prometheus
prometheus 的安装非常简单,就是一个二进制,下载启动就可以了。之所以还要单列一个章节来说明,是因为 Prometheus 要想作为时序库接收 remote write 协议的数据,即夜莺收到时序数据之后,要想转发给 Prometheus,需要 Prometheus 在启动参数里添加 --enable-feature=remote-write-receiver ,否则夜莺转发数据的时候会报 404,因为没有这个参数,Prometheus 就不会开启 /api/v1/write 接口的处理监听。
另外,Prometheus 新版本之后,这个参数的写法发生了一些变化,通过 ./prometheus --help | grep write 可以找到新的参数写法。下面是一段小脚本,用于安装 Prometheus,供参考:
# install prometheus
mkdir -p /opt/prometheus
wget https://s3-gz01.didistatic.com/n9e-pub/prome/prometheus-2.28.0.linux-amd64.tar.gz -O prometheus-2.28.0.linux-amd64.tar.gz
tar xf prometheus-2.28.0.linux-amd64.tar.gz
cp -far prometheus-2.28.0.linux-amd64/*  /opt/prometheus/

# 添加prometheus开机启动
cat <<EOF >/etc/systemd/system/prometheus.service
[Unit]
Description="prometheus"
Documentation=https://prometheus.io/
After=network.target

[Service]
Type=simple

ExecStart=/opt/prometheus/prometheus  --config.file=/opt/prometheus/prometheus.yml --storage.tsdb.path=/opt/prometheus/data --web.enable-lifecycle --enable-feature=remote-write-receiver --query.lookback-delta=2m

Restart=on-failure
SuccessExitStatus=0
LimitNOFILE=65536
StandardOutput=syslog
StandardError=syslog
SyslogIdentifier=prometheus


[Install]
WantedBy=multi-user.target
EOF
##启动服务
systemctl enable prometheus
systemctl restart prometheus
systemctl status prometheus
安装categraf采集客户端
##下载编译后的包
cd /data
wget https://download.flashcat.cloud/categraf-v0.2.40-linux-amd64.tar.gz
##配置nightingal的server端
v /data/categraf-v0.2.40-linux-amd64 /data/categraf
vi /data/categraf/conf/config.toml
###配置采集器采集到的数据写入nightingale的server中。
[[writers]]
url = "http://127.0.0.1:19000/prometheus/v1/write"
##配置详解
[global]
# 启动的时候是否在stdout中打印配置内容
print_configs = false

# 机器名,作为本机的唯一标识,会为时序数据自动附加一个 agent_hostname=$hostname 的标签
# hostname 配置如果为空,自动取本机的机器名
# hostname 配置如果不为空,就使用用户配置的内容作为hostname
# 用户配置的hostname字符串中,可以包含变量,目前支持两个变量,
# $hostname 和 $ip,如果字符串中出现这两个变量,就会自动替换
# $hostname 自动替换为本机机器名,$ip 自动替换为本机IP
# 建议大家使用 --test 做一下测试,看看输出的内容是否符合预期
hostname = ""

# 是否忽略主机名的标签,如果设置为true,时序数据中就不会自动附加agent_hostname=$hostname 的标签
omit_hostname = false

# 时序数据的时间戳使用ms还是s,默认是ms,是因为remote write协议使用ms作为时间戳的单位
precision = "ms"

# 全局采集频率,15秒采集一次
interval = 15

# 全局附加标签,一行一个,这些写的标签会自动附到时序数据上
# [global.labels]
# region = "shanghai"
# env = "localhost"

# 发给后端的时序数据,会先被扔到 categraf 内存队列里,每个采集插件一个队列
# chan_size 定义了队列最大长度
# batch 是每次从队列中取多少条,发送给后端backend
[writer_opt]
# default: 2000
batch = 2000
# channel(as queue) size
chan_size = 10000

# 后端backend配置,在toml中 [[]] 表示数组,所以可以配置多个writer
# 每个writer可以有不同的url,不同的basic auth信息
[[writers]]
url = "http://127.0.0.1:19000/prometheus/v1/write"

# Basic auth username
basic_auth_user = ""

# Basic auth password
basic_auth_pass = ""

# timeout settings, unit: ms
timeout = 5000
dial_timeout = 2500
max_idle_conns_per_host = 100

##启动文件
cat > /etc/systemd/system/categraf.service <<'EOF'
[Unit]
Description="Categraf"
After=network.target

[Service]
User=root
Group=root
ExecStart=/data/categraf/categraf
WorkingDirectory=/data/categraf/
Restart=on-failure
SuccessExitStatus=0
LimitNOFILE=65536
StandardOutput=syslog
StandardError=syslog
SyslogIdentifier=categraf
[Install]
WantedBy=multi-user.target
EOF
## 添加开机启动
systemctl daemon-reload
systemctl enable categraf.service
systemctl restart categraf.service
systemctl status categraf.service
- 感谢你赐予我前进的力量
赞赏者名单
因为你们的支持让我意识到写文章的价值🙏
作者编辑不易,如有转载请注明出处。完整转载来自https://wangairui.com 网站名称:猫扑linux
评论
匿名评论
隐私政策
你无需删除空行,直接评论以获取最佳展示效果


